|
Wednesday, June 3, 2015
Black Bean Burritos

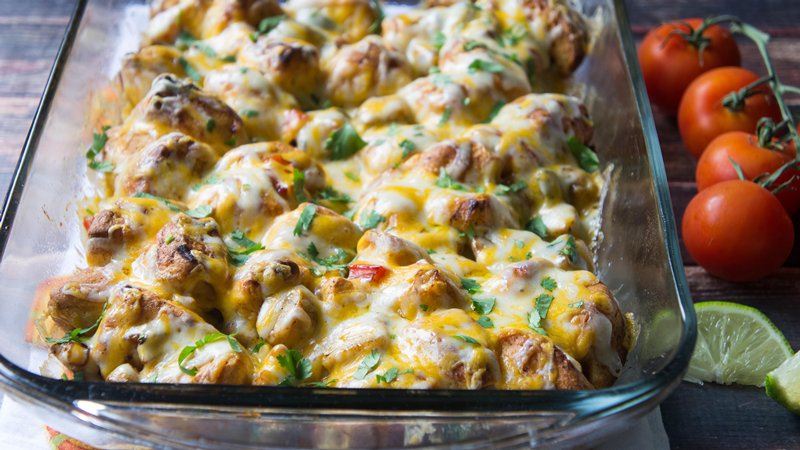
Chicken Fajita Bubble-Up Bake
I got the recipe from the Betty Crocker website. I've been looking for easier quick meals lately with soccer and softball season in full swing.
Chicken Fajita Bubble-Up Bake
Ingredients
- 1 can (7.5 oz) Pillsbury™ Country Style™ refrigerated biscuits
- 1 package Old El Paso™ fajita seasoning mix
- 1/2 cup diced red bell pepper
- 1/2 cup diced green bell pepper
- 1/2 cup diced onion
- 1 tablespoon vegetable oil
- 2 boneless skinless chicken breasts, cut into bite-sized pieces
- 1/2 cup water
- 2 cups shredded Colby-Monterey Jack cheese blend
- Directions
- 1 Heat oven to 375°F. Lightly spray 13x9-inch (3-quart) glass baking dish with cooking spray.
- 2 Separate dough into 8 biscuits. Cut each biscuit into quarters; place in medium bowl. Sprinkle with 1 tablespoon of the fajita seasoning mix; toss to coat. Set aside.
- 3 Heat 10-inch skillet over medium heat. Add bell peppers and onion; cook 3 to 5 minutes, stirring occasionally, until peppers and onion blister and char slightly or until cooked to your liking. Remove peppers and onion from skillet; keep warm.
- 4 Return same skillet to medium heat. Add oil and chicken; cook on each side until browned and no longer pink in center. Sprinkle remaining fajita seasoning mix over chicken. Add water; cook and stir until sauce thickens. Return peppers and onion to skillet; stir to coat.
- 5 Spoon chicken, peppers and onion into baking dish. Top with seasoning-coated biscuit pieces.
- 6 Bake 20 minutes or until biscuit pieces are thoroughly baked and light golden brown. Sprinkle cheese over top; bake 5 minutes longer or until cheese is melted.
Tuesday, April 28, 2015
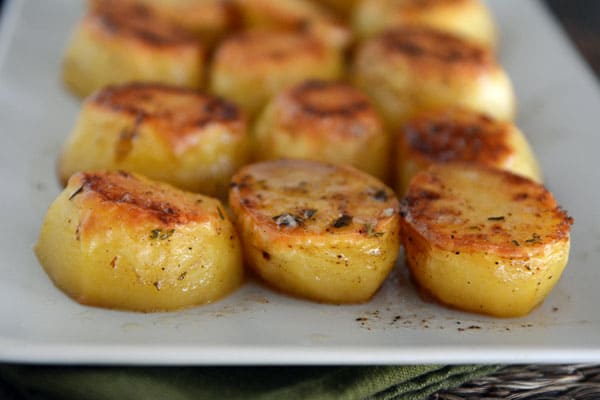
Melting Roasted Potatoes
These were better than I expected. They were really good even though I didn't have Yukon gold and just used russet potatoes. I thought the chicken broth would make it too soupy so I didn't add all of it. That was a mistake. It reduced just fine and then we were wishing we had more if the yummy sauce to drizzle over the top of the potatoes. I also roasted them for 20 minutes then flipped them over and added the garlic and chicken broth and baked them for another 15 minutes. That was plenty of time and they were done after that. So my baking time was 15 minutes less than the recipe called for.
Melting Roasted Potatoes
YIELD: SERVES 6-8
INGREDIENTS
- 3 pounds Yukon Gold potatoes, peeled
- 4 tablespoons butter, melted
- 1 teaspoon dried thyme (or 1 tablespoon fresh)
- 3/4 teaspoon salt
- 1/4 teaspoon pepper
- 1 1/2 cups low-sodium chicken broth
- 2 garlic cloves, finely minced
DIRECTIONS
- Preheat the oven to 450 degrees F, making sure one of the oven racks is in the upper-middle position. Square the ends off the potatoes by cutting off the rounded edges (you don't have to chop off a lot, but you want the ends flat) and then cutting the potatoes into about 1-inch thick slices.
- In a large bowl, toss the potatoes with the butter, thyme, salt and pepper. Place the potatoes in a single layer in a 9X13-inch ceramic or metal baking dish (don't use glass as it can shatter when adding the chicken broth later).
- Roast the potatoes for 20-22 minutes, until the bottoms are browning around the edges. Remove the baking pan from the oven and flip the potatoes with a flat spatula. Return to the oven and roast for another 15 minutes.
- Remove the pan from the oven, flip the potatoes again and add the chicken broth and garlic. Roast once more (last time, promise) until the potatoes are tender and the sauce has reduced just slightly, about 15 minutes.
- Serve the potatoes with the sauce drizzled over the top.
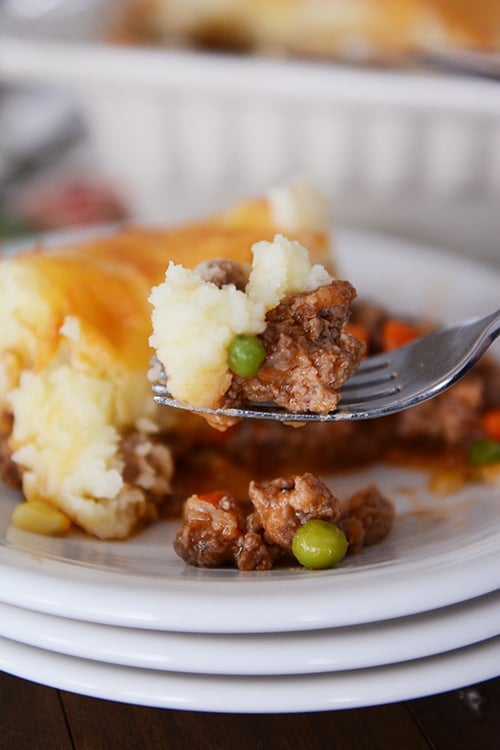
Shepherd's Pie
This was really good. It took my brain a while to adjust to the great taste. It was expecting the shepherd's pie I never really liked, but this version was great! Even better, the kids all loved it too!
Shepherd’s Pie
INGREDIENTS
- 3 medium russet potatoes, peeled and chopped (about 4-5 cups)
- 2 tablespoons butter
- 1/2 - 1 cup milk
- 1/2 cup Parmesan cheese
- 1/2 cup shredded sharp cheddar cheese
- Salt and pepper
- 1 teaspoon garlic powder
- 1 egg yolk
- 2 - 2 1/2 pounds ground beef, turkey, lamb, or sausage (or a combination of any)
- 1 cup chopped onion
- 2 large carrots chopped small (about 1 cup)
- 2 cloves garlic, finely pressed
- 1 teaspoon salt
- 1/2 teaspoon black pepper
- 3 tablespoons flour
- 1 tablespoon tomato paste
- 1 1/4 cups low-sodium beef or chicken broth
- 1 teaspoon worcestershire sauce
- 1/4 teaspoon dried oregano
- 1/4 teaspoon dried thyme (or 1 teaspoon fresh)
- 1/4 teaspoon dried rosemary (or 1 teaspoon fresh)
- 1/2 cup frozen corn kernels
- 1/2 cup frozen peas
- 1 cup shredded sharp cheddar cheese
Potato Layer:
Meat Filling:
DIRECTIONS
- Preheat the oven to 375 degrees F. Lightly grease a 9X13-inch pan with cooking spray (I've also used a slightly smaller ceramic casserole dish with good results, too, just makes the layers slightly thicker).
- Place the potatoes in a medium saucepan and cover with 1-2 inches of water. Add a teaspoon of salt. Bring to a boil and cook for 15 minutes or so (it will depend on how large or small the potatoes are cut) until the potatoes are tender.
- Drain the potatoes and return to the pot. Mash the potatoes lightly. Add the butter, milk (start with 1/2 cup and add more if needed), Parmesan and cheddar cheeses, salt and pepper to taste, and garlic powder. Mash together until smooth and creamy. Stir in the egg yolk until combined.
- For the meat and vegetable mixture, in a large 12-inch nonstick skillet over medium heat, add the ground meat, onion, carrots, garlic, salt and pepper. Cook, breaking the meat into small pieces, until the meat is no longer pink and the vegetables are starting to soften, 5-7 minutes or so. Drain any excess grease from the mixture.
- Sprinkle the flour over the meat and cook over medium to medium-high heat for a minute or so, stirring constantly. Stir in the tomato paste, broth, Worcestershire sauce, oregano, thyme, and rosemary. Bring to a simmer and continue to simmer gently for 10 minutes.
- Stir in the corn and peas.
- Pour the meat mixture into the prepared pan. Spread the mashed potatoes over the top all the way to the edges of the pan creating a seal over the meat mixture. Sprinkle the 1 cup cheddar over the top of the potatoes.
- Bake for 35-40 minutes until the edges are golden and the casserole is bubbling. Let it rest out of the oven for 10 minutes before serving.
Thursday, April 9, 2015
One Pot Creamy Tuna and Shells
- One Pot Creamy Tuna and Shells
I was really happy with how this turned out. I was especially happy how quick and easy it turned out to be. We are just beginning the soccer/softball season so fast dinners are essential! I may have added a little less than a tablespoon of dijon mustard because I was a little worried if I added too much that the kids wouldn't like it as much. Scott added extra to his.
- INGREDIENTS
- 1 teaspoon oil
- 1 medium shallot (or 1/4 cup finely chopped white or yellow onion)
- 2 garlic cloves, finely minced or 1 teaspoon garlic powder
- 1 cup milk
- 2 cups water
- 2 1/4 cups low-sodium chicken broth
- 16 ounces small pasta shells
- 1 teaspoon salt
- 1/2 teaspoon pepper
- 2 tablespoons milk or heavy cream
- 1 tablespoon Dijon mustard
- 1 tablespoon fresh lemon juice
- 2 5-ounce cans white albacore tuna, drained
- Salt and pepper to taste
- Fresh parsley, chopped
- Lemon wedges, for serving
DIRECTIONS
- In a 4- or 5-quart pot, heat the oil over medium heat and sauté the shallot (or onion) and garlic for 2-3 minutes.
- Stir in the milk, water, broth, shells, salt and pepper. Bring to a simmer, and cook, uncovered, stirring often (at a simmer, not a rigorous boil) until the pasta is al dente, according to package directions (the pasta will continue to cook a bit over the next few minutes so don't overcook it in this step). Each brand of pasta will will differ slightly; depending on the brand, you may need to add a bit more liquid toward the end of cooking time but do so gradually so it isn't too soupy. There should be a bit of liquid left even after the shells are just tender. They'll continue to soften up and the liquid will be absorbed as other ingredients are stirred in and as it rests.
- Stir in the milk or heavy cream, mustard, and lemon juice. Add the tuna and mix gently until combined. Stir in additional salt and pepper to taste, if needed. Let the pasta rest for 5-10 minutes - it will thicken up and get nice and creamy.
- Sprinkle with parsley and serve with extra lemon wedges - it is delicious with lemon juice drizzled over the top of individual servings.
Recipe Source: from Mel’s Kitchen Cafe
Sunday, March 29, 2015
Whole Grain Honey Bran Muffins
When I made these I put raisins in half on them and left the other half plain. Sari and Kate prefer no raisins, Leah likes them with raisins, and Lucy switches back and forth depending on her mood. Scott and I like them with raisins, it adds a little sweetness. I used butter and added the brown sugar. They were sooo good. I'm sure they would still be plenty sweet without the sugar.
Whole Grain Honey Bran Muffins
Yield: Makes 30-36 muffins
I've only ever made these with 100% whole wheat flour but I think all-purpose could work just fine. I grind my own whole wheat flour which usually produces fluffier flour; if using storebought whole wheat flour, make sure to use a light hand when measuring (don't pack the flour into the measuring cup).
Also, for measuring, I always tend to measure on the light side of things – fluffing the ingredients, scooping the cup in and leveling, as opposed to scooping in and shaking to level which packs more into the cup.
Ingredients
- 4 cups wheat bran
- 2 cups boiling water
- 3/4 cup melted coconut oil or butter
- 1/4 cup brown sugar (optional, only if you want them a touch sweeter)
- 1/2 cup molasses
- 1/2 cup honey
- 3 large eggs
- 1 teaspoon vanilla
- 4 1/4 cups whole wheat flour (see note above)
- 1 1/4 teaspoons baking powder
- 1 teaspoon salt
- 1 tablespoon baking soda
- 2/3 cup milk
- 1 1/4 cups buttermilk
Directions
- In a large bowl, combine the wheat bran and wheat germ. Pour in the boiling water and stir to combine. The mixture may look crumbly, it's ok if it doesn't appear to be soaking wet. Let it rest for 10 minutes.
- Stir in the coconut oil (or butter), sugar (if using), molasses, honey, eggs and vanilla. In another bowl, whisk together the flour, baking powder, salt and soda. Whisk together the milk and buttermilk.
- Add 1/3 of the dry ingredients to the muffin batter and mix until just combined. Stir in 1/2 of the milk mixture. Add another 1/3 of the dry ingredients, stirring just until combined. Add the last half of the milk and stir together. Add the final dry ingredients and mix just until combined (don't over mix or the muffins might be dense).
- Let the batter rest for 20-30 minutes if you have the time. It isn't completely necessary but I think it gives the muffins a slightly higher rise than baking them right away. Preheat the oven to 350 degrees F.
- Fill lightly greased muffin tins about 2/3 full and bake for 18-22 minutes until the tops spring back lightly to the touch. Don't overbake; we don't want dry muffins here.
- The cooled muffins can be stored covered at room temperature for 2-3 days or frozen.
3.0
http://www.melskitchencafe.com/whole-grain-honey-bran-muffins/Wednesday, March 18, 2015
Fried Rice
This is one of my very favorite recipes. This rice is so good. I usually double the carrots and peas. We like veggies!
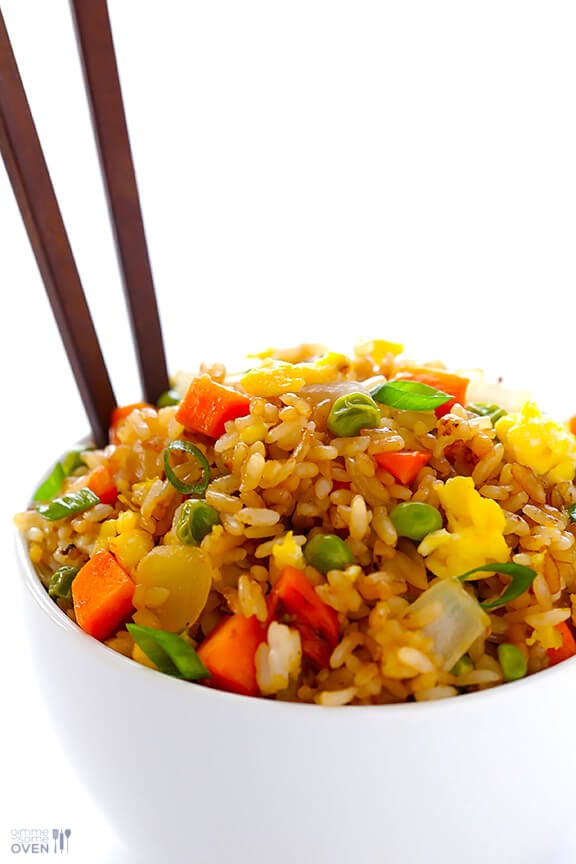
FRIED RICE
Learn how to make fried rice with this classic fried rice recipe. It tastes even better than the restaurant version!
INGREDIENTS:
- 3 Tbsp. butter, divided
- 2 eggs, whisked
- 2 medium carrots, peeled and diced
- 1 small white onion, diced
- 1/2 cup frozen peas
- 3 cloves garlic, minced
- salt and pepper
- 4 cups cooked and chilled rice (I prefer short-grain white rice)
- 3 green onions, thinly sliced
- 3-4 Tbsp. soy sauce, or more to taste
- 2 tsp. oyster sauce (optional)
- 1/2 tsp. toasted sesame oil
DIRECTIONS:
Heat 1/2 tablespoon of butter in a large skillet over medium-high heat until melted. Add egg, and cook until scrambled, stirring occasionally. Remove egg, and transfer to a separate plate.
Add an additional 1 tablespoon butter to the pan and heat until melted. Add carrots, onion, peas and garlic, and season with a generous pinch of salt and pepper. Saute for about 5 minutes or until the onion and carrots are soft. Increase heat to high, add in the remaining 1 1/2 tablespoons of butter, and stir until melted. Immediately add the rice, green onions, soy sauce and oyster sauce (if using), and stir until combined. Continue stirring for an additional 3 minutes to fry the rice. Then add in the eggs and stir to combine. Add the sesame oil, stir to combine, and remove from heat.
Serve warm.
http://www.gimmesomeoven.com/fried-rice-recipe/
Subscribe to:
Posts (Atom)